# Administrators documentation
## Table of contents
- [1. Welcome](#1-welcome)
- [2. Single Server Installaton](#2-single-server-installation)
- [3. Docker Installation](#3-docker-installation)
- [4. Docker Deployment options](#4-docker-deployment-options)
- [5. Configuration](#5-configuration)
- [6. Manage pages](#6-manage-pages)
- [7. Django admin dashboard](#7-django-admin-dashboard)
- [8. On portal workflow](#8-on-portal-workflow)
- [9. On user roles](#9-on-user-roles)
- [10. Adding languages for Captions and subtitles](#10-adding-languages-for-captions-and-subtitles)
- [11. Add/delete categories and tags](#11-adddelete-categories-and-tags)
- [12. Video transcoding](#12-video-transcoding)
- [13. How To Add A Static Page To The Sidebar](#13-how-to-add-a-static-page-to-the-sidebar)
- [14. Add Google Analytics](#14-add-google-analytics)
- [15. Debugging email issues](#15-debugging-email-issues)
- [16. Frequently Asked Questions](#16-frequently-asked-questions)
- [17. Cookie consent code](#17-cookie-consent-code)
- [18. Disable encoding and show only original file](#18-disable-encoding-and-show-only-original-file)
- [19. Rounded corners on videos](#19-rounded-corners)
- [20. Translations](#20-translations)
- [21. How to change the video frames on videos](#21-how-to-change-the-video-frames-on-videos)
- [22. Role-Based Access Control](#22-role-based-access-control)
- [23. SAML setup](#23-saml-setup)
- [24. Identity Providers setup](#24-identity-providers-setup)
- [25. Custom urls](#25-custom-urls)
- [26. Allowed files](#26-allowed-files)
- [27. User upload limits](#27-user-upload-limits)
- [28. Whisper Transcribe for Automatic Subtitles](#28-whisper-transcribe-for-automatic-subtitles)
## 1. Welcome
This page is created for MediaCMS administrators that are responsible for setting up the software, maintaining it and making modifications.
## 2. Single Server Installation
The core dependencies are python3, Django, celery, PostgreSQL, redis, ffmpeg. Any system that can have these dependencies installed, can run MediaCMS. But the install.sh is only tested in Linux Ubuntu 24 and 22 versions.
Installation on an Ubuntu 22/24 system with git utility installed should be completed in a few minutes with the following steps.
Make sure you run it as user root, on a clear system, since the automatic script will install and configure the following services: Celery/PostgreSQL/Redis/Nginx and will override any existing settings.
```bash
mkdir /home/mediacms.io && cd /home/mediacms.io/
git clone https://github.com/mediacms-io/mediacms
cd /home/mediacms.io/mediacms/ && bash ./install.sh
```
The script will ask if you have a URL where you want to deploy MediaCMS, otherwise it will use localhost. If you provide a URL, it will use Let's Encrypt service to install a valid ssl certificate.
### Update
If you've used the above way to install MediaCMS, update with the following:
```bash
cd /home/mediacms.io/mediacms # enter mediacms directory
source /home/mediacms.io/bin/activate # use virtualenv
git pull # update code
pip install -r requirements.txt -U # run pip install to update
python manage.py migrate # run Django migrations
sudo systemctl restart mediacms celery_long celery_short # restart services
```
### Update from version 2 to version 3
Version 3 is using Django 4 and Celery 5, and needs a recent Python 3.x version. If you are updating from an older version, make sure Python is updated first. Version 2 could run on Python 3.6, but version 3 needs Python3.8 and higher.
The syntax for starting Celery has also changed, so you have to copy the celery related systemctl files and restart
```
# cp deploy/local_install/celery_long.service /etc/systemd/system/celery_long.service
# cp deploy/local_install/celery_short.service /etc/systemd/system/celery_short.service
# cp deploy/local_install/celery_beat.service /etc/systemd/system/celery_beat.service
# systemctl daemon-reload
# systemctl start celery_long celery_short celery_beat
```
### Configuration
Checkout the configuration section here.
### Maintenance
Database can be backed up with pg_dump and media_files on /home/mediacms.io/mediacms/media_files include original files and encoded/transcoded versions
## 3. Docker Installation
## Installation
Install a recent version of [Docker](https://docs.docker.com/get-docker/), and [Docker Compose](https://docs.docker.com/compose/install/).
For Ubuntu systems this is:
```bash
curl -fsSL https://get.docker.com -o get-docker.sh
sudo sh get-docker.sh
```
Then run as root
```bash
git clone https://github.com/mediacms-io/mediacms
cd mediacms
```
The default option is to serve MediaCMS on all ips available of the server (including localhost).
If you want to explore more options (including setup of https with letsencrypt certificate) checkout [Docker deployment](/docs/admins_docs.md#4-docker-deployment-options) section for different docker-compose setups to use.
Run
```bash
docker compose up
```
This will download all MediaCMS related Docker images and start all containers. Once it finishes, MediaCMS will be installed and available on http://localhost or http://ip
A user admin has been created with random password, you should be able to see it at the end of migrations container, eg
```
migrations_1 | Created admin user with password: gwg1clfkwf
```
or if you have set the ADMIN_PASSWORD variable on docker-compose file you have used (example `docker-compose.yaml`), that variable will be set as the admin user's password
`Note`: if you want to use the automatic transcriptions, you have to do one of the following:
* either use the docker-compose.full.yaml, so in this case run `docker-compose -f docker-compose.yaml -f docker-compose.full.yaml up`
* or edit the docker-compose.yaml file and set the image for the celery_worker service as mediacms/mediacms:full instead of mediacms/mediacms:latest
Plus set variable `USE_WHISPER_TRANSCRIBE = True` in the settings.py file
### Update
Get latest MediaCMS image and stop/start containers
```bash
cd /path/to/mediacms/installation
docker pull mediacms/mediacms
docker compose down
docker compose up
```
### Update from version 2 to version 3
Version 3 is using Python 3.11 and PostgreSQL 15. If you are updating from an older version, that was using PostgreSQL 13, the automatic update will not work, as you will receive the following message when the PostgreSQL container starts:
```
db_1 | 2023-06-27 11:07:42.959 UTC [1] FATAL: database files are incompatible with server
db_1 | 2023-06-27 11:07:42.959 UTC [1] DETAIL: The data directory was initialized by PostgreSQL version 13, which is not compatible with this version 15.2.
```
At this point there are two options: either edit the Docker Compose file and make use of the existing postgres:13 image, or otherwise you have to perform the migration from postgresql 13 to version 15. More notes on https://github.com/mediacms-io/mediacms/pull/749
## Configuration
Checkout the configuration docs here.
### Maintenance
Database is stored on ../postgres_data/ and media_files on media_files/
## 4. Docker Deployment options
**⚠️ IMPORTANT**: MediaCMS 7.3 introduces a new Docker architecture. If you're upgrading from an earlier version, please see the [Migration Guide](DOCKER_V7.3_MIGRATION.md).
### Architecture Overview
MediaCMS 7.3+ uses a modern microservices architecture with dedicated containers:
- **nginx** - Web server for static/media files and reverse proxy
- **web** - Django application (uWSGI)
- **celery_short** - Short-running background tasks
- **celery_long** - Long-running tasks (video encoding)
- **celery_beat** - Task scheduler
- **migrations** - Database migrations (runs on startup)
- **db** - PostgreSQL database
- **redis** - Cache and message broker
### Key Changes from Previous Versions
- ✅ **No supervisord** - Native Docker process management
- ✅ **Dedicated images** per service
- ✅ **No ENABLE_* environment variables** - Services are separated into individual containers
- ✅ **Production images** don't mount source code (immutable)
- ✅ **config/** directory for centralized configuration
- ✅ **Separate celery workers** for short and long tasks
### Configuration
Application settings can be overridden using environment variables in your docker-compose file or by building a custom image with a modified `cms/local_settings.py` file.
Key environment variables:
- `FRONTEND_HOST` - Your domain (e.g., `https://mediacms.example.com`)
- `PORTAL_NAME` - Portal name
- `SECRET_KEY` - Django secret key
- `DEBUG` - Enable debug mode (development only)
- Database and Redis connection settings
See the [Migration Guide](DOCKER_V7.3_MIGRATION.md) for detailed configuration options
### Simple Deployment (HTTP)
Use `docker-compose.yaml` for a standard HTTP deployment on port 80:
```bash
docker compose up -d
```
This starts all services (nginx, web, celery workers, database, redis) with the nginx container exposed on port 80. Access at http://localhost or http://your-server-ip.
**Features:**
- Production-ready with immutable images
- Named volumes for data persistence
- Separate containers for each service
### Production Deployment with HTTPS (Let's Encrypt)
Use `docker-compose-cert.yaml` for automatic HTTPS with Let's Encrypt:
**Prerequisites:**
- Domain name pointing to your server
- Ports 80 and 443 open
**Setup:**
1. Edit `docker-compose-cert.yaml` and update:
- `VIRTUAL_HOST` - Your domain
- `LETSENCRYPT_HOST` - Your domain
- `LETSENCRYPT_EMAIL` - Your email
2. Run:
```bash
docker compose -f docker-compose-cert.yaml up -d
```
This uses `nginxproxy/nginx-proxy` with `acme-companion` for automatic HTTPS certificate management. Access at https://your-domain.com.
### Development Deployment
Use `docker-compose-dev.yaml` for development with live code reloading:
```bash
docker compose -f docker-compose-dev.yaml up
```
**Features:**
- Source code mounted for live editing
- Django debug mode enabled
- Frontend dev server on port 8088
- Direct Django access (no nginx) on port 80
### Scaling Workers
Scale celery workers independently based on load:
```bash
# Scale short task workers to 3 instances
docker compose up -d --scale celery_short=3
# Scale long task workers to 2 instances
docker compose up -d --scale celery_long=2
```
### Using Extra Codecs (Full Image)
For advanced transcoding features (including Whisper for automatic subtitles), use the full worker image:
Edit your docker-compose file:
```yaml
celery_long:
image: mediacms/mediacms-worker:7.3-full # Changed from :7.3
```
Then restart:
```bash
docker compose up -d celery_long
```
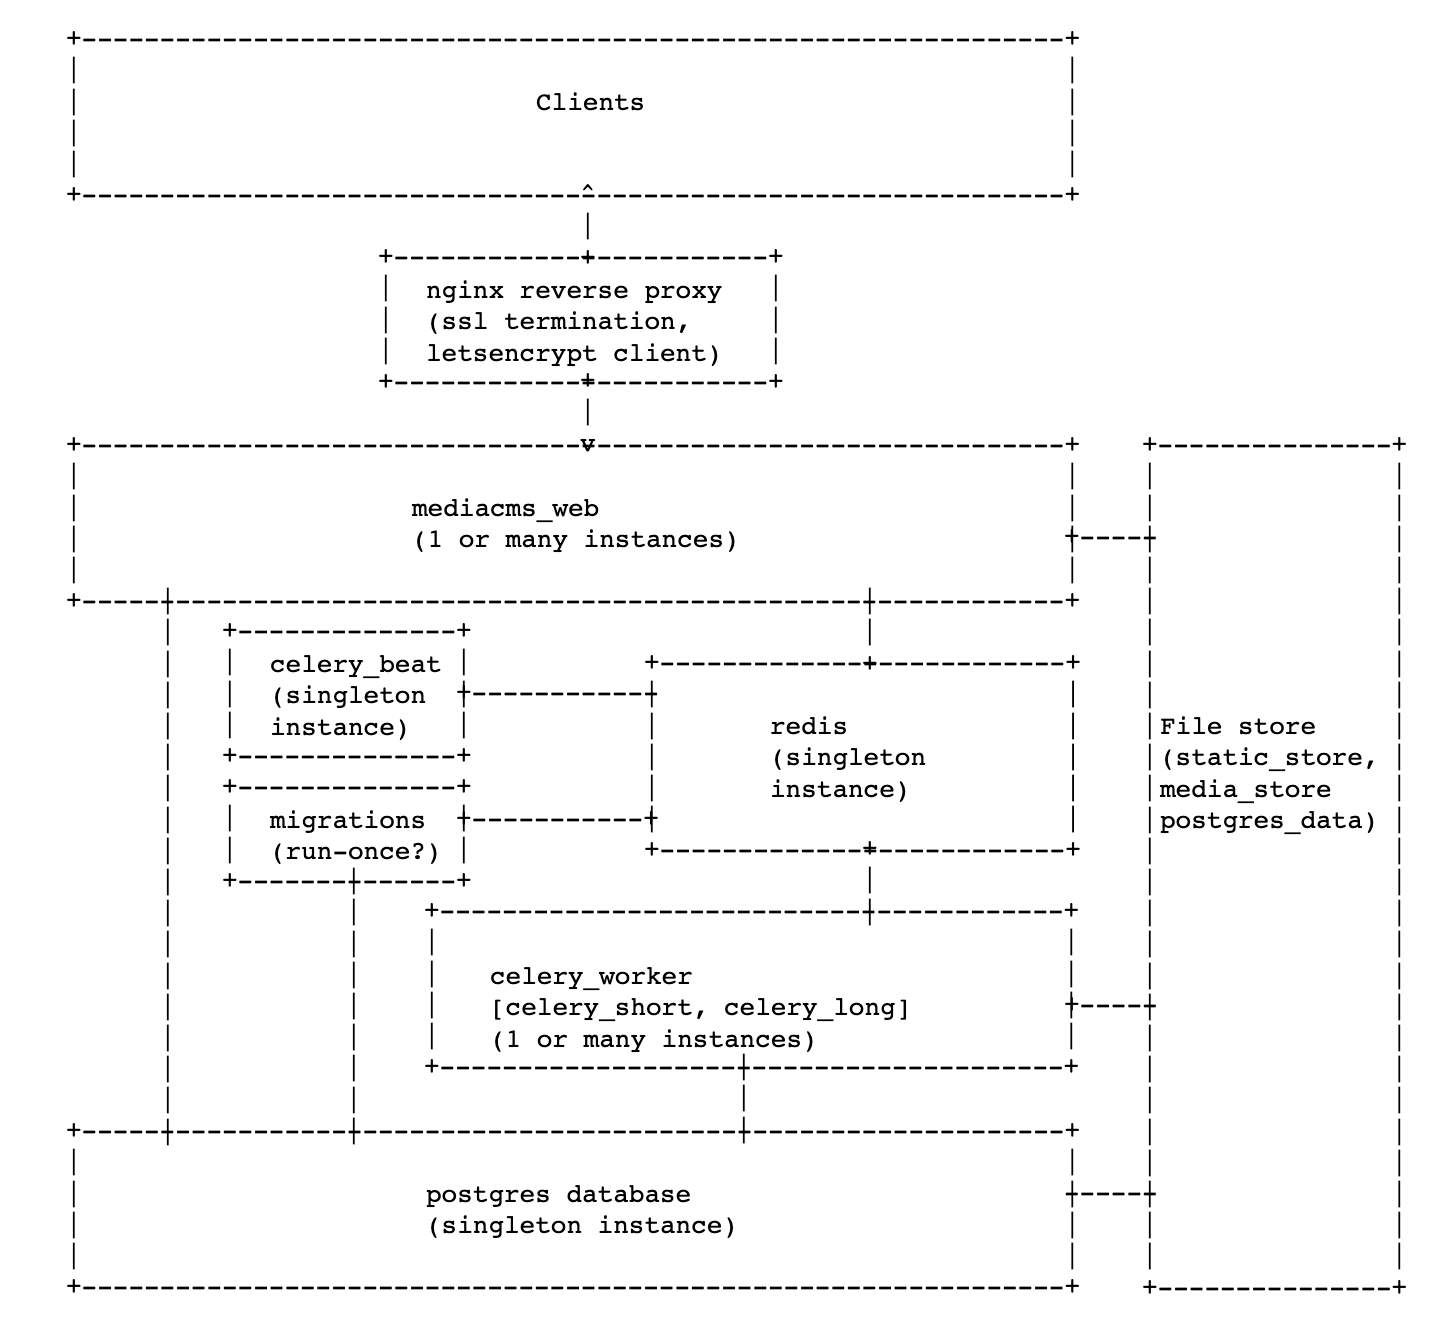
### A Scaleable Deployment Architecture (Docker, Swarm, Kubernetes)
The architecture below provides a conceptual design for deployments based on kubernetes and docker swarm. It allows for horizontal scaleability through the use of multiple web instances and celery workers. For large deployments, managed postgres, redis and storage may be adopted.
## 5. Configuration
Several options are available on `cms/settings.py`, most of the things that are allowed or should be disallowed are described there.
It is advisable to override any of them by adding it to `local_settings.py`.
**Single server installation:** edit `cms/local_settings.py`, make changes and restart MediaCMS:
```bash
systemctl restart mediacms celery_beat celery_short celery_long
```
**Docker installation:** Configuration can be done in two ways:
1. **Environment variables** (recommended for simple changes):
Add to your docker-compose file:
```yaml
environment:
FRONTEND_HOST: 'https://mediacms.example.com'
PORTAL_NAME: 'My MediaCMS'
```
2. **Custom image with local_settings.py** (for complex changes):
- Create a custom Dockerfile:
```dockerfile
FROM mediacms/mediacms:7.3
COPY my_custom_settings.py /home/mediacms.io/mediacms/cms/local_settings.py
```
- Build and use your custom image
After changes, restart the affected containers:
```bash
docker compose restart web celery_short celery_long celery_beat
```
### 5.1 Change portal logo
Find the default svg files for the white theme on `static/images/logo_dark.svg` and for the dark theme on `static/images/logo_light.svg`
You can specify new svg paths to override by editing the `PORTAL_LOGO_DARK_SVG` and `PORTAL_LOGO_LIGHT_SVG` variables in `settings.py`.
You can also use custom pngs, by setting the variables `PORTAL_LOGO_DARK_PNG` and `PORTAL_LOGO_LIGHT_PNG` in `settings.py`. The svg files have priority over png files, so if both are set, svg files will be used.
In any case, make sure the files are placed on the static/images folder.
### 5.2 Set global portal title
set `PORTAL_NAME`, eg
```
PORTAL_NAME = 'my awesome portal'
```
### 5.3 Control who can add media
By default `CAN_ADD_MEDIA = "all"` means that all registered users can add media. Other valid options are:
- **email_verified**, a user not only has to register an account but also verify the email (by clicking the link sent upon registration). Apparently email configuration need to work, otherise users won't receive emails.
- **advancedUser**, only users that are marked as advanced users can add media. Admins or MediaCMS managers can make users advanced users by editing their profile and selecting advancedUser.
### 5.4 What is the portal workflow
The `PORTAL_WORKFLOW` variable specifies what happens to newly uploaded media, whether they appear on listings (as the index page, or search)
- **public** is the default option and means that a media can appear on listings. If media type is video, it will appear once at least a task that produces an encoded version of the file has finished succesfully. For other type of files, as image/audio they appear instantly
- **private** means that newly uploaded content is private - only users can see it or MediaCMS editors, managers and admins. Those can also set the status to public or unlisted
- **unlisted** means that items are unlisted. However if a user visits the url of an unlisted media, it will be shown (as opposed to private)
### 5.5 Show or hide the Sign in button
to show button:
```
LOGIN_ALLOWED = True
```
to hide button:
```
LOGIN_ALLOWED = False
```
### 5.6 Show or hide the Register button
to show button:
```
REGISTER_ALLOWED = True
```
to hide button:
```
REGISTER_ALLOWED = False
```
### 5.7 Show or hide the upload media button
To show:
```
UPLOAD_MEDIA_ALLOWED = True
```
To hide:
```
UPLOAD_MEDIA_ALLOWED = False
```
### 5.8 Show or hide the actions buttons (like/dislike/report)
Make changes (True/False) to any of the following:
```
- CAN_LIKE_MEDIA = True # whether the like media appears
- CAN_DISLIKE_MEDIA = True # whether the dislike media appears
- CAN_REPORT_MEDIA = True # whether the report media appears
- CAN_SHARE_MEDIA = True # whether the share media appears
```
### 5.9 Show or hide the download option on a media
Edit `templates/config/installation/features.html` and set
```
download: false
```
### 5.10 Automatically hide media upon being reported
set a low number for variable `REPORTED_TIMES_THRESHOLD`
eg
```
REPORTED_TIMES_THRESHOLD = 2
```
once the limit is reached, media goes to private state and an email is sent to admins
### 5.11 Set a custom message on the media upload page
this message will appear below the media drag and drop form
```
PRE_UPLOAD_MEDIA_MESSAGE = 'custom message'
```
### 5.12 Set email settings
Set correct settings per provider
```
DEFAULT_FROM_EMAIL = 'info@mediacms.io'
EMAIL_HOST_PASSWORD = 'xyz'
EMAIL_HOST_USER = 'info@mediacms.io'
EMAIL_USE_TLS = True
SERVER_EMAIL = DEFAULT_FROM_EMAIL
EMAIL_HOST = 'mediacms.io'
EMAIL_PORT = 587
ADMIN_EMAIL_LIST = ['info@mediacms.io']
```
### 5.13 Disallow user registrations from specific domains
Set domains that are not valid for registration via this variable:
```
RESTRICTED_DOMAINS_FOR_USER_REGISTRATION = [
'xxx.com', 'emaildomainwhatever.com']
```
Alternatively, allow only permitted domains to register. This can be useful if you're using mediacms as a private service within an organization, and want to give free registration for those in the org, but deny registration from all other domains. Setting this option bans all domains NOT in the list from registering. Default is a blank list, which is ignored. To disable, set to a blank list.
```
ALLOWED_DOMAINS_FOR_USER_REGISTRATION = [
"private.com",
"vod.private.com",
"my.favorite.domain",
"test.private.com"]
```
### 5.14 Require a review by MediaCMS editors/managers/admins
set value
```
MEDIA_IS_REVIEWED = False
```
any uploaded media now needs to be reviewed before it can appear to the listings.
MediaCMS editors/managers/admins can visit the media page and edit it, where they can see the option to mark media as reviewed. By default this is set to True, so all media don't require to be reviewed
### 5.15 Specify maximum number of media for a playlist
set a different threshold on variable `MAX_MEDIA_PER_PLAYLIST`
eg
```
MAX_MEDIA_PER_PLAYLIST = 14
```
### 5.16 Specify maximum size of a media that can be uploaded
change `UPLOAD_MAX_SIZE`.
default is 4GB
```
UPLOAD_MAX_SIZE = 800 * 1024 * 1000 * 5
```
### 5.17 Specify maximum size of comments
change `MAX_CHARS_FOR_COMMENT`
default:
```
MAX_CHARS_FOR_COMMENT = 10000
```
### 5.18 How many files to upload in parallel
set a different threshold for `UPLOAD_MAX_FILES_NUMBER`
default:
```
UPLOAD_MAX_FILES_NUMBER = 100
```
### 5.18 force users confirm their email upon registrations
default option for email confirmation is optional. Set this to mandatory in order to force users confirm their email before they can login
```
ACCOUNT_EMAIL_VERIFICATION = 'optional'
```
### 5.20 Rate limit account login attempts
after this number is reached
```
ACCOUNT_LOGIN_ATTEMPTS_LIMIT = 20
```
sets a timeout (in seconds)
```
ACCOUNT_LOGIN_ATTEMPTS_TIMEOUT = 5
```
### 5.21 Disallow user registration
set the following variable to False
```
USERS_CAN_SELF_REGISTER = True
```
### 5.22 Configure notifications
Global notifications that are implemented are controlled by the following options:
```
USERS_NOTIFICATIONS = {
'MEDIA_ADDED': True,
}
```
If you want to disable notification for new media, set to False
Admins also receive notifications on different events, set any of the following to False to disable
```
ADMINS_NOTIFICATIONS = {
'NEW_USER': True,
'MEDIA_ADDED': True,
'MEDIA_REPORTED': True,
}
```
- NEW_USER: a new user is added
- MEDIA_ADDED: a media is added
- MEDIA_REPORTED: the report for a media was hit
### 5.23 Configure only member access to media
- Make the portal workflow public, but at the same time set `GLOBAL_LOGIN_REQUIRED = True` so that only logged in users can see content.
- You can either set `REGISTER_ALLOWED = False` if you want to add members yourself or checkout options on "django-allauth settings" that affects registration in `cms/settings.py`. Eg set the portal invite only, or set email confirmation as mandatory, so that you control who registers.
### 5.24 Enable the sitemap
Whether or not to enable generation of a sitemap file at http://your_installation/sitemap.xml (default: False)
```
GENERATE_SITEMAP = False
```
### 5.25 Control who can add comments
By default `CAN_COMMENT = "all"` means that all registered users can add comment. Other valid options are:
- **email_verified**, a user not only has to register an account but also verify the email (by clicking the link sent upon registration). Apparently email configuration need to work, otherise users won't receive emails.
- **advancedUser**, only users that are marked as advanced users can add comment. Admins or MediaCMS managers can make users advanced users by editing their profile and selecting advancedUser.
### 5.26 Control whether anonymous users can list all users
By default, anonymous users can view the list of all users on the platform. To restrict this to authenticated users only, set:
```
ALLOW_ANONYMOUS_USER_LISTING = False
```
When set to False, only logged-in users will be able to access the user listing API endpoint.
### 5.27 Control who can see the members page
By default `CAN_SEE_MEMBERS_PAGE = "all"` means that all registered users can see the members page. Other valid options are:
- **editors**, only MediaCMS editors can view the page
- **admins**, only MediaCMS admins can view the page
### 5.28 Configure user search fields
By default, when searching for users (e.g., in bulk actions modals or the users API), the search is performed on the user's name and username. You can configure this behavior using the `USER_SEARCH_FIELD` setting:
```
USER_SEARCH_FIELD = "name_username" # Default - searches in name and username
```
To also include email addresses in the search and display them in the user interface:
```
USER_SEARCH_FIELD = "name_username_email" # Searches in name, username, and email
```
When set to `"name_username_email"`:
- The user search will also match email addresses
- The email field will be returned in the API response
- Frontend components will display users as "Name - Email" instead of "Name - Username"
This setting is useful when you want to make it easier to find users by their email addresses, particularly in administrative interfaces like bulk action modals.
### 5.29 Require user approval on registration
By default, users do not require approval, so they can login immediately after registration (if registration is open). However, if the parameter `USERS_NEEDS_TO_BE_APPROVED` is set to `True`, they will first have to have their accounts approved by an administrator before they can successfully sign in.
Administrators can approve users through the following ways: 1. through Django administration, 2. through the users management page, 3. through editing the profile page directly. In all cases, set 'Is approved' to True.
### 5.30 Show or hide media count numbers on categories and tags pages
By default, the number of media items is displayed next to each category and tag on the `/categories` and `/tags` pages. To hide these numbers:
```
INCLUDE_LISTING_NUMBERS = False
```
To show the numbers (default behavior):
```
INCLUDE_LISTING_NUMBERS = True
```
This setting affects only the visual display on the categories and tags listing pages and does not impact the functionality of filtering by categories or tags.
## 6. Manage pages
to be written
## 7. Django admin dashboard
## 8. On portal workflow
Who can publish content, how content appears on public listings.Difference between statuses (private, unlisted, public)
## 9. On user roles
Differences over MediaCMS manager, MediaCMS editor, logged in user
## 10. Adding languages for Captions and subtitles
to be written
## 11. Add/delete categories and tags
Through the admin section - http://your_installation/admin/
## 12. Video transcoding
Add / remove resolutions and profiles by modifying the database table of `Encode profiles` through https://your_installation/admin/files/encodeprofile/
For example, the `Active` state of any profile can be toggled to enable or disable it.
## 13. How To Add A Static Page To The Sidebar
### 1. Create your html page in templates/cms/
e.g. duplicate and rename about.html
```
sudo cp templates/cms/about.html templates/cms/volunteer.html
```
### 2. Create your css file in static/css/
```
touch static/css/volunteer.css
```
### 3. In your html file, update block headermeta to reflect your new page
```
{% block headermeta %}
{% endblock headermeta %}
```
### 4. In your html file, update block innercontent to reflect your actual content
Write whatever you like.
### 5. In your css file, write matching styles for you html file.
Write whatever you like.
### 6. Add your view to files/views.py
```
def volunteer(request):
"""Volunteer view"""
context = {}
return render(request, "cms/volunteer.html", context)
```
### 7. Add your url pattern to files/urls.py
```
urlpatterns = [
url(r"^$", views.index),
url(r"^about", views.about, name="about"),
url(r"^volunteer", views.volunteer, name="volunteer"),
```
### 8. Add your page to the left sidebar
To add a link to your page as a menu item in the left sidebar,
add the following code after the last line in _commons.js
```
/* Checks that a given selector has loaded. */
const checkElement = async selector => {
while ( document.querySelector(selector) === null) {
await new Promise( resolve => requestAnimationFrame(resolve) )
}
return document.querySelector(selector);
};
/* Checks that sidebar nav menu has loaded, then adds menu item. */
checkElement('.nav-menu')
.then((element) => {
(function(){
var a = document.createElement('a');
a.href = "/volunteer";
a.title = "Volunteer";
var s = document.createElement('span');
s.className = "menu-item-icon";
var icon = document.createElement('i');
icon.className = "material-icons";
icon.setAttribute("data-icon", "people");
s.appendChild(icon);
a.appendChild(s);
var linkText = document.createTextNode("Volunteer");
var t = document.createElement('span');
t.appendChild(linkText);
a.appendChild(t);
var listItem = document.createElement('li');
listItem.className = "link-item";
listItem.appendChild(a);
//if signed out use 3rd nav-menu
var elem = document.querySelector(".nav-menu:nth-child(3) nav ul");
var loc = elem.innerText;
if (loc.includes("About")){
elem.insertBefore(listItem, elem.children[2]);
} else { //if signed in use 4th nav-menu
elem = document.querySelector(".nav-menu:nth-child(4) nav ul");
elem.insertBefore(listItem, elem.children[2]);
}
})();
});
```
### 9. Restart the mediacms web server
On docker:
```
sudo docker stop mediacms_web_1 && sudo docker start mediacms_web_1
```
Otherwise
```
sudo systemctl restart mediacms
```
## 14. Add Google Analytics
Instructions contributed by @alberto98fx
1. Create a file:
``` touch $DIR/mediacms/templates/tracking.html ```
2. Add the Gtag/Analytics script
3. Inside ``` $DIR/mediacms/templates/root.html``` you'll see a file like this one:
```
{% block head %}
{% block headtitle %}{{PORTAL_NAME}}{% endblock headtitle %}
{% include "common/head-meta.html" %}
{% block headermeta %}
{%endblock headermeta %}
{% block externallinks %}{% endblock externallinks %}
{% include "common/head-links.html" %}
{% block topimports %}{%endblock topimports %}
{% include "config/index.html" %}
{% endblock head %}
```
4. Add ``` {% include "tracking.html" %} ``` at the end inside the section ``````
5. If you are using Docker and didn't mount the entire dir you need to bind a new volume:
```
web:
image: mediacms/mediacms:latest
restart: unless-stopped
ports:
- "80:80"
deploy:
replicas: 1
volumes:
- ./templates/root.html:/home/mediacms.io/mediacms/templates/root.html
- ./templates/tracking.html://home/mediacms.io/mediacms/templates/tracking.html
```
## 15. Debugging email issues
On the [Configuration](https://github.com/mediacms-io/mediacms/blob/main/docs/admins_docs.md#5-configuration) section of this guide we've see how to edit the email settings.
In case we are yet unable to receive email from MediaCMS, the following may help us debug the issue - in most cases it is an issue of setting the correct username, password or TLS option
Enter the Django shell, example if you're using the Single Server installation:
```bash
source /home/mediacms.io/bin/activate
python manage.py shell
```
and inside the shell
```bash
from django.core.mail import EmailMessage
from django.conf import settings
settings.EMAIL_BACKEND = 'django.core.mail.backends.smtp.EmailBackend'
email = EmailMessage(
'title',
'msg',
settings.DEFAULT_FROM_EMAIL,
['recipient@email.com'],
)
email.send(fail_silently=False)
```
You have the chance to either receive the email (in this case it will be sent to recipient@email.com) otherwise you will see the error.
For example, while specifying wrong password for my Gmail account I get
```
SMTPAuthenticationError: (535, b'5.7.8 Username and Password not accepted. Learn more at\n5.7.8 https://support.google.com/mail/?p=BadCredentials d4sm12687785wrc.34 - gsmtp')
```
## 16. Frequently Asked Questions
Video is playing but preview thumbnails are not showing for large video files
Chances are that the sprites file was not created correctly.
The output of files.tasks.produce_sprite_from_video() function in this case is something like this
```
convert-im6.q16: width or height exceeds limit `/tmp/img001.jpg' @ error/cache.c/OpenPixelCache/3912.
```
Solution: edit file `/etc/ImageMagick-6/policy.xml` and set bigger values for the lines that contain width and height. For example
```
```
Newly added video files now will be able to produce the sprites file needed for thumbnail previews. To re-run that task on existing videos, enter the Django shell
```
root@8433f923ccf5:/home/mediacms.io/mediacms# source /home/mediacms.io/bin/activate
root@8433f923ccf5:/home/mediacms.io/mediacms# python manage.py shell
Python 3.8.14 (default, Sep 13 2022, 02:23:58)
```
and run
```
In [1]: from files.models import Media
In [2]: from files.tasks import produce_sprite_from_video
In [3]: for media in Media.objects.filter(media_type='video', sprites=''):
...: produce_sprite_from_video(media.friendly_token)
```
this will re-create the sprites for videos that the task failed.
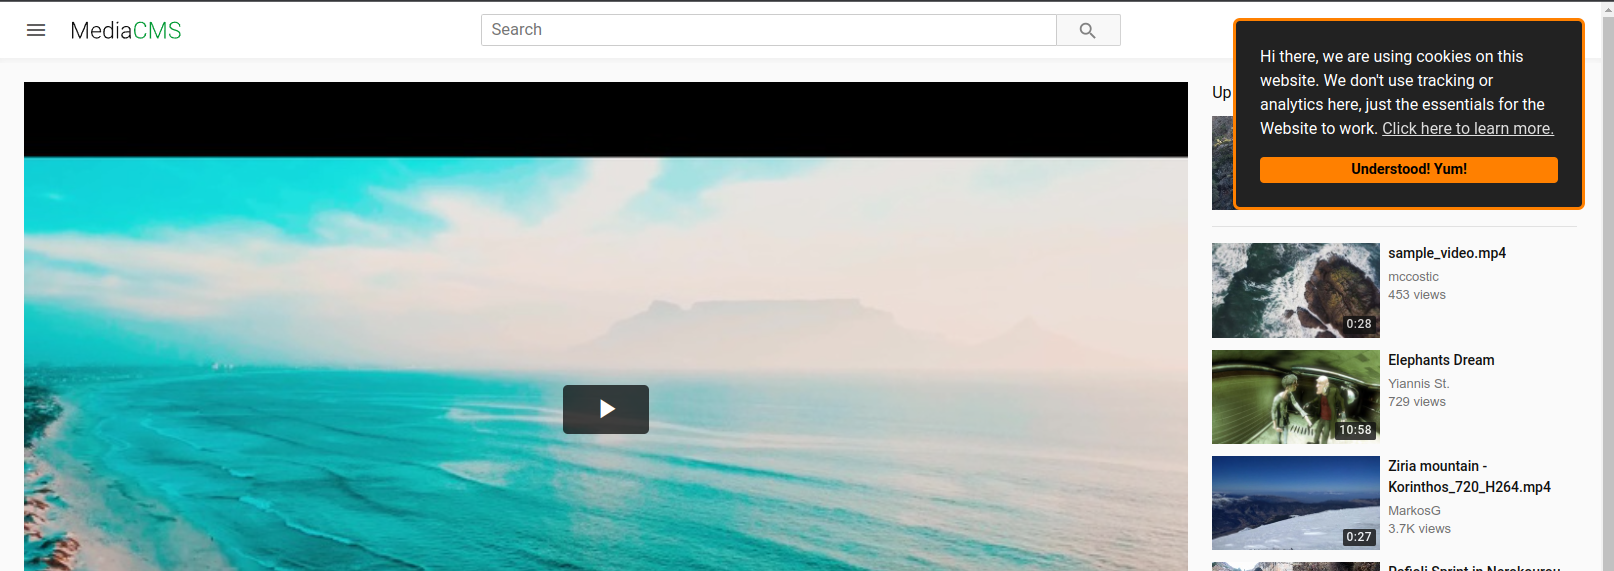
## 17. Cookie consent code
On file `templates/components/header.html` you can find a simple cookie consent code. It is commented, so you have to remove the `{% comment %}` and `{% endcomment %}` lines in order to enable it. Or you can replace that part with your own code that handles cookie consent banners.
## 18. Disable encoding and show only original file
When videos are uploaded, they are getting encoded to multiple resolutions, a procedure called transcoding. Sometimes this is not needed and you only need to show the original file, eg when MediaCMS is running on a low capabilities server. To achieve this, edit settings.py and set
```
DO_NOT_TRANSCODE_VIDEO = True
```
This will disable the transcoding process and only the original file will be shown. Note that this will also disable the sprites file creation, so you will not have the preview thumbnails on the video player.
## 19. Rounded corners on videos
By default the video player and media items are now having rounded corners, on larger screens (not in mobile). If you don't like this change, set `USE_ROUNDED_CORNERS = False` in `local_settings.py`.
## 20. Translations
### 20.1 Set a default language
By default MediaCMS is available in a number of languages. To set the default language, edit `settings.py` and set LANGUAGE_CODE to the code of one of the languages.
### 20.2 Remove existing languages
To limit the number of languages that are shown as available, remove them from the LANGUAGES list in `settings.py` or comment them. Only what is there is shown.
### 20.3 Improve existing translation
To make improvements in existing translated content, in a language that is already translated, check the language by the code name in `files/frontend-translations/` and edit the corresponding file.
### 20.4 Add more content to existing translation
Not all text is translated, so at any time you may find strings missing that need to be added to the translation. The idea here is that
a) you made the text as translatable, in the code
b) you add the translated string
For a), you have to see if the string to be translated lives in the frontend directory (React app) or on the Django templates. There are examples for both.
1. the Django templates, which is found in templates/ dir. Have a look on `templates/cms/about.html` to see an example of how it is done
2. the frontend code (React), have a look how `translateString` is used in `frontend`
After the string is marked as translatable, add the string to `files/frontend-translations/en.py` first, and then run
```
python manage.py process_translations
```
In order to populate the string in all the languages. NO PR will be accepted if this procedure is not followed. You don't have to translate the string to all supported languages, but the command has to run and populate the existing dictionaries with the new strings for all languages. This ensures that there is no missing string to be translated in any language.
After this command is run, translate the string to the language you want. If the string to be translated lives in Django templates, you don't have to re-build the frontend. If the change lives in the frontend, you will have to re-build in order to see the changes. The Makefile command `make build-frontend` can help with this.
### 20.5 Add a new language and translate
To add a new language: add the language in settings.py, then add the file in `files/frontend-translations/`. Make sure you copy the initial strings by copying `files/frontend-translations/en.py` to it.
## 21. How to change the video frames on videos
By default while watching a video you can hover and see the small images named sprites that are extracted every 10 seconds of a video. You can change this number to something smaller by performing the following:
* edit ./frontend/src/static/js/components/media-viewer/VideoViewer/index.js and change `seconds: 10 ` to the value you prefer, eg 2.
* edit settings.py and set the same number for value SPRITE_NUM_SECS
* now you have to re-build the frontend: the easiest way is to run `make build-frontend`, which requires Docker
After that, newly uploaded videos will have sprites generated with the new number of seconds.
## 22. Role-Based Access Control
By default there are 3 statuses for any Media that lives on the system, public, unlisted, private. When RBAC support is added, a user that is part of a group has access to media that are published to one or more categories that the group is associated with. The workflow is this:
1. A Group is created
2. A Category is associated with the Group
3. A User is added to the Group
Now user can view the Media even if it is in private state. User also sees all media in Category page
When user is added to group, they can be set as Member, Contributor, Manager.
- Member: user can view media that are published on one or more categories that this group is associated with
- Contributor: besides viewing, user can also edit the Media in a category associated with this Group. They can also publish Media to this category
- Manager: same as Contributor for now
Use cases facilitated with RBAC:
- viewing a Media in private state: if RBAC is enabled, if user is Member on a Group that is associated with a Category, and the media is published to this Category, then user can view the media
- editing a Media: if RBAC is enabled, and user is Contributor to one or more Categories, they can publish media to these Categories as long as they are associated with one Group
- viewing all media of a category: if RBAC is enabled, and user visits a Category, they are able to see the listing of all media that are published in this category, independent of their state, provided that the category is associated with a group that the user is member of
- viewing all categories associated with groups the user is member of: if RBAC is enabled, and user visits the listing of categories, they can view all categories that are associated with a group the user is member
How to enable RBAC support:
```
USE_RBAC = True
```
on `local_settings.py` and restart the instance.
## 23. SAML setup
SAML authentication is supported along with the option to utilize the SAML response and do useful things as setting up the user role in MediaCMS or participation in groups.
To enable SAML support, edit local_settings.py and set the following options:
```
USE_RBAC = True
USE_SAML = True
USE_IDENTITY_PROVIDERS = True
USE_X_FORWARDED_HOST = True
SECURE_PROXY_SSL_HEADER = ('HTTP_X_FORWARDED_PROTO', 'https')
SECURE_SSL_REDIRECT = True
CSRF_COOKIE_SECURE = True
SESSION_COOKIE_SECURE = True
SOCIALACCOUNT_ADAPTER = 'saml_auth.adapter.SAMLAccountAdapter'
SOCIALACCOUNT_PROVIDERS = {
"saml": {
"provider_class": "saml_auth.custom.provider.CustomSAMLProvider",
}
}
```
To set a SAML provider:
- Step 1: Add SAML Identity Provider
1. Navigate to Admin panel
2. Select "Identity Provider"
3. Configure as follows:
- **Provider**: saml
- **Provider ID**: an ID for the provider
- **IDP Config Name**: a name for the provider
- **Client ID**: the identifier that is part of the login, and that is shared with the IDP.
- **Site**: Set the default one
- Step 2: Add SAML Configuration
Select the SAML Configurations tab, create a new one and set:
1. **IDP ID**: Must be a URL
2. **IDP Certificate**: x509cert from your SAML provider
3. **SSO URL**:
4. **SLO URL**:
5. **SP Metadata URL**: The metadata URL that the IDP will utilize. This can be https://{portal}/saml/metadata and is autogenerated by MediaCMS
- Step 3: Set other Options
1. **Email Settings**:
- `verified_email`: When enabled, emails from SAML responses will be marked as verified
- `Remove from groups`: When enabled, user is removed from a group after login, if they have been removed from the group on the IDP
2. **Global Role Mapping**: Maps the role returned by SAML (as set in the SAML Configuration tab) with the role in MediaCMS
3. **Group Role Mapping**: Maps the role returned by SAML (as set in the SAML Configuration tab) with the role in groups that user will be added
4. **Group mapping**: This creates groups associated with this IDP. Group ids as they come from SAML, associated with MediaCMS groups
5. **Category Mapping**: This maps a group id (from SAML response) with a category in MediaCMS
A full SAML deployment with [EntraID guide and troubleshooting steps is available here.](./saml_entraid_setup.md). This guide can be used as reference for other IDPs too.
## 24. Identity Providers setup
A separate Django app identity_providers has been added in order to facilitate a number of configurations related to different identity providers. If this is enabled, it gives the following options:
- allows to add an Identity Provider through Django admin, and set a number of mappings, as Group Mapping, Global Role mapping and more. While SAML is the only provider that can be added out of the box, any identity provider supported by django allauth can be added with minimal effort. If the response of the identity provider contains attributes as role, or groups, then these can be mapped to MediaCMS specific roles (advanced user, editor, manager, admin) and groups (rbac groups)
- saves SAML response logs after user is authenticated (can be utilized for other providers too)
- allows to specify a list of login options through the admin (eg system login, identity provider login)
to enable the identity providers, set the following setting on `local_settings.py`:
```
USE_IDENTITY_PROVIDERS = True
```
Visiting the admin, you will see the Identity Providers tab and you can add one.
## 25. Custom urls
To enable custom urls, set `ALLOW_CUSTOM_MEDIA_URLS = True` on settings.py or local_settings.py
This will enable editing the URL of the media, while editing a media. If the URL is already taken you get a message you cannot update this.
## 26. Allowed files
MediaCMS performs identification attempts on new file uploads and only allows certain file types specified in the `ALLOWED_MEDIA_UPLOAD_TYPES` setting. By default, only ["video", "audio", "image", "pdf"] files are allowed.
When a file is not identified as one of these allowed types, the file gets removed from the system and there's an entry indicating that this is not a supported media type.
If you want to change the allowed file types, edit the `ALLOWED_MEDIA_UPLOAD_TYPES` list in your `settings.py` or `local_settings.py` file. If 'all' is specified in this list, no check is performed and all files are allowed.
## 27. User upload limits
MediaCMS allows you to set a maximum number of media files that each user can upload. This is controlled by the `NUMBER_OF_MEDIA_USER_CAN_UPLOAD` setting in `settings.py` or `local_settings.py`. By default, this is set to 100 media items per user.
When a user reaches this limit, they will no longer be able to upload new media until they delete some of their existing content. This limit applies regardless of the user's role or permissions in the system.
To change the maximum number of uploads allowed per user, modify the `NUMBER_OF_MEDIA_USER_CAN_UPLOAD` value in your settings file:
```
NUMBER_OF_MEDIA_USER_CAN_UPLOAD = 5
```
## 28. Whisper Transcribe for Automatic Subtitles
MediaCMS can integrate with OpenAI's Whisper to automatically generate subtitles for your media files. This feature is useful for making your content more accessible.
### How it works
When the whisper transcribe task is triggered for a media file, MediaCMS runs the `whisper` command-line tool to process the audio and generate a subtitle file in VTT format. The generated subtitles are then associated with the media and are available under the "automatic" language option.
### Configuration
Transcription functionality is available only for the Docker installation. To enable this feature, you must either use the `docker-compose.full.yaml` file, as it contains an image with the necessary requirements, or you can also set that celery_worker service is usine mediacms:full image instead of mediacms:latest. Then you also have to set the setting: `USE_WHISPER_TRANSCRIBE = True` in your local_settings.py file.
By default, all users have the ability to send a request for a video to be transcribed, as well as transcribed and translated to English. If you wish to change this behavior, you can edit the `settings.py` file and set `USER_CAN_TRANSCRIBE_VIDEO=False`.
The transcription uses the base model of Whisper speech-to-text by default. However, you can change the model by editing the `WHISPER_MODEL` setting in `settings.py`.